Carl's Trailer Sales

Your Trailer Headquarters in Belle Fourche, SD!

  • Directions
  • Contact Us
  • Show the search form

Trailers

  • All Trailers
  • Dump Trailers
  • Enclosed Trailers
  • Flatbed Trailers
  • Horse Trailers
  • Stock Trailers
  • Used Trailers

Products & Services

  • SureStep
  • Carl’s Customs
  • Truck Flatbeds
  • Bale Handlers
  • Feed Dispensers
  • Services

Contact

  • Home
  • Directions
  • Contact Us
  • Email Sign-ups

About

  • About Us
  • Manufacturer Links
  • Our Team
Hide the search form
  • All Trailers
  • Used Trailers
  • SureStep
  • Carl’s Customs
  • Truck Flatbeds
  • Bale Handlers
  • Feed Dispensers
  • Services

Trailer Wheel Bearings Guide: Greasing, Repacking and Service

November 11, 2026

Trailer wheel bearings help the hub turn on the axle spindle while carrying its load. They are easy to overlook because most of the working parts are hidden. Looking at the tire is not the same as checking what is happening inside the hub.

Whether you haul livestock around the Black Hills or pull an enclosed trailer for work, start with two questions: What hub system do you have, and what does its manufacturer require? A grease fitting does not answer both questions.

This guide helps you recognize service concerns, compare maintenance methods and prepare for a conversation with a shop. It is not a replacement for your trailer and axle service manuals. Bearing adjustment, lifting procedures, replacement parts and wheel-fastener torque must match your equipment.

Images in this guide are for illustration purposes only.

Signs your trailer wheel bearings need service

Take an unusual wheel-end condition seriously. Possible warning signs include abnormal heat, grinding or other new noise, lubricant leakage, excessive movement and rough rotation during a proper inspection.

These observations do not identify the failed part by themselves. A brake or another wheel-end component may be involved. Do not assume a hot hub only needs more grease, or that a quiet wheel proves the bearings are healthy.

If you notice a concern while towing, stop somewhere safe and arrange advice or assistance before continuing. Do not touch a hot hub to judge its temperature or crawl under a trailer at the roadside. There is no reliable number of miles you can safely drive on a noisy bearing.

Give the service provider a useful description:

  • Which wheel or side appears affected?
  • When did the symptom start?
  • Was the trailer loaded?
  • Was bearing or brake work recently performed?
  • Is there visible leakage or damage?
  • What maintenance records and component labels are available?

If braking performance also changed, mention that separately. Our trailer brakes not working guide covers that related concern. A bearing inspection and an electrical brake diagnosis are different jobs.

How often should you grease or repack trailer bearings?

Use the current maintenance schedule for your exact axle and hub. Two published examples show why a single internet answer can mislead:

  • Dexter’s hand-packing guidance gives a 12-month or 12,000-mile interval, whichever comes first, for the bearings it addresses.
  • Lippert’s Super Lube axle article gives 12 months or 36,000 miles, whichever comes first, for that lubrication system.

Those figures describe different manufacturer guidance. They are not a range from which you should choose the longest interval. Check the manual and any operating-condition requirements for your equipment.

If you do not know when a used trailer was serviced, treat the history as unknown. Ask for records or arrange an inspection rather than choosing a date based on how clean the trailer looks.

Keep a short maintenance log. Record the date, mileage if tracked, axle identification, hub type, grease used and work completed. “Added grease” and “removed hubs, inspected components and repacked” are different entries.

You can use that record when planning a busy hauling season. If service will fall due during a trip, speak with the shop before departure. If damage or abnormal operation appears sooner, do not wait for the calendar reminder.

Know your hub type before you start

Conventional grease hubs

These use a service procedure that includes removing the hub to access and inspect the bearings. A hand repack is more than filling a cap. It includes cleaning, inspection, correct lubrication, sealing and adjustment.

Find the axle identification and matching manual before ordering a kit or taking anything apart. A similar-looking hub is not proof that the procedure or parts match.

Dexter E-Z Lube and Lippert Super Lube systems

These systems provide a lubrication path through a spindle fitting. Their manufacturer procedures differ from simply adding grease under a dust cap.

Convenient lubrication does not eliminate scheduled inspection. It also does not show you the condition of every hidden surface. If there is leakage, damaged hardware or uncertain service history, ask whether a full inspection is needed before using the fitting.

Sealed cartridge systems, including Dexter Nev-R-Lube

A sealed cartridge is a different design. Do not apply a conventional hand-packing procedure to it. Dexter’s Nev-R-Lube instructions include inspection requirements even though routine grease repacking is not the service method.

“Sealed” should not become “ignore it.” Use the appropriate manual for inspection and replacement decisions. If you cannot establish the hub type, pause and identify it before adding lubricant or loosening the spindle nut.

How to grease E-Z Lube or Super Lube style hubs
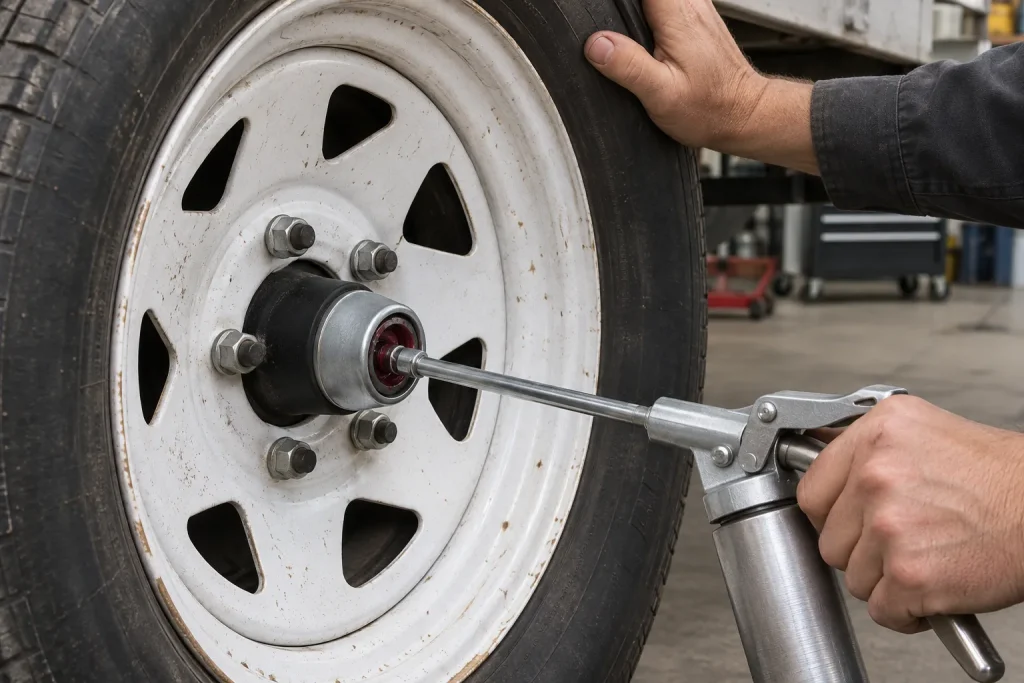
Grease gun nozzle on the EZ-Lube fitting of a white spoke trailer wheel hub with the dust-cap plug removed
Grease gun on an EZ-Lube style trailer hub fitting. Images in this guide are for illustration purposes only.

First, confirm that the fitting belongs to the system covered by your manual. Do not infer the internal design from a rubber plug alone.

Dexter and Lippert describe a general sequence of accessing the fitting, applying the specified grease while rotating the hub, watching for displaced grease, then cleaning the area and replacing the plug. Use the exact manufacturer’s procedure for your axle.

Dexter calls for a manual grease gun and warns against pneumatic guns that can deliver grease too quickly. Do not force grease into a system that is not behaving as the instructions describe. Stop and investigate rather than assuming more pressure will solve it.

Safe support comes before any work requiring a raised wheel. Use the trailer manufacturer’s approved frame lifting and support points and stands rated for the load. Do not support the trailer by the axle or suspension. Never work underneath it on a jack alone.

Prepare the correct manual, compatible grease, a suitable manual gun, clean wiping materials and the required lifting equipment before starting. If any of those are missing, arranging shop service is a reasonable choice.

Afterward, document what was done. Lubrication through a fitting should not be recorded as a complete disassembly and bearing inspection.

How to repack trailer bearings by hand
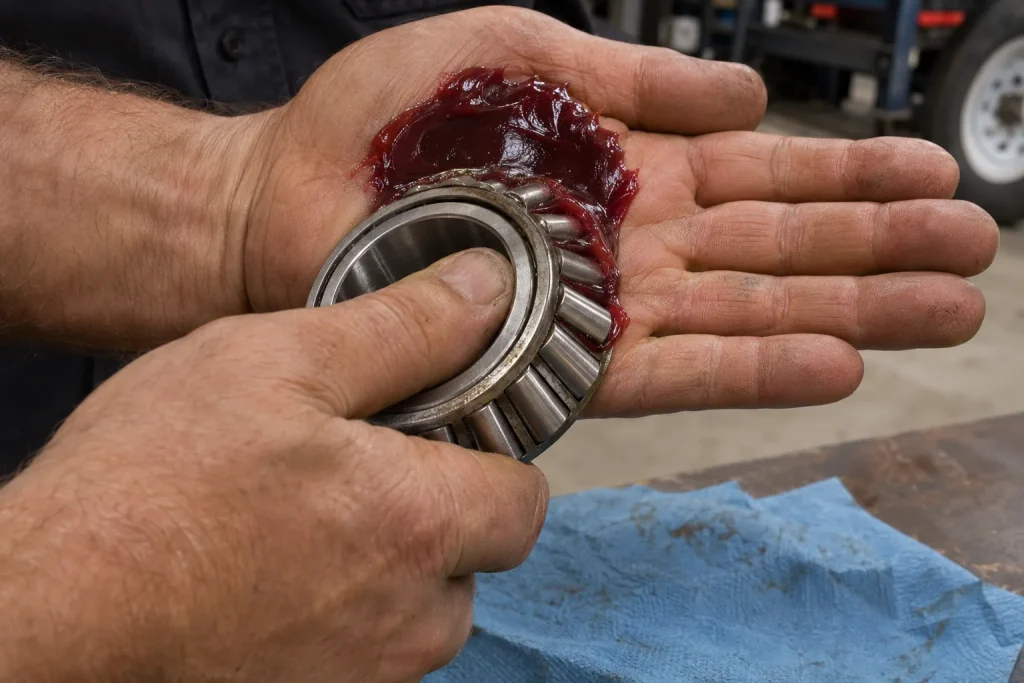
Gloved hands packing red wheel bearing grease into a tapered roller bearing over a shop towel
Hand packing grease into a tapered roller bearing. Images in this guide are for illustration purposes only.

A complete repack follows a sequence, but the details depend on the assembly. This overview is intended to help you understand the work you are requesting, not to supply universal workshop instructions.

1. Identify and prepare

Confirm the axle and hub information, correct service instructions and replacement parts. Arrange safe support and a clean work area. Keep the parts from different wheel ends clearly separated.

Before authorizing a shop visit, ask what the quoted service includes. Does it include inspection, seals, adjustment and a check of adjacent brake components? Ask how additional damaged parts will be handled.

2. Remove and clean

The technician removes the wheel and hub as directed, then cleans the components for inspection. Do not improvise a cleaning method or spin a dry bearing with compressed air.

Old grease needs to be removed sufficiently for the inspection and any required change of lubricant. A new coating over a dirty assembly does not establish that its surfaces are sound.

3. Inspect the bearings, cups and related parts

The bearing cone is the assembly containing the rollers. The cup, often called the race, is the matching running surface in the hub.

Dexter and Lippert identify pitting, flaking or corrosion as reasons to replace affected bearing components. Their instructions call for replacing the cone and cup as a matched set when damaged. The seal, spindle and hub also need attention under the applicable procedure.

Inspection is the decision point. Do not continue with a routine repack when a component needs replacement or the cause of damage is uncertain.

4. Pack and reassemble

Dexter’s hand-packing guide describes working approved grease through the rollers and applying a light coating to the cup. Reassembly then requires the specified seal installation, bearing adjustment and retention method.

These steps are not interchangeable between hub systems. This page intentionally does not provide a generic spindle-nut torque or a universal “tighten, then back off” instruction.

5. Finish the checks

The technician completes the manufacturer’s rotation, adjustment and assembly checks. Wheels must be installed using the applicable fastener specifications and recheck schedule.

Ask for a record of the work, any parts replaced and anything that needs follow-up. Keep it with the trailer rather than in a collection of receipts you cannot identify later.

What grease should you use for trailer bearings?

Choose by the axle manufacturer’s specifications, not by color, brand popularity or a broad “heavy duty” label.

Dexter’s cited hub and bearing instruction sheet specifies a lithium-complex, NLGI No. 2 grease with additional performance requirements. NLGI grade alone is not the whole specification. Compare the product’s technical information with the full requirements for your axle.

Lippert warns against mixing incompatible grease types. If you cannot establish what is already in the hub, get guidance on cleaning and changing lubricant rather than adding a different product on top.

Keep the package or record the exact product in your maintenance log. A note that says “red grease” will not help the next person verify compatibility.

The question is not which grease wins an online ranking. It is whether the lubricant is approved for your equipment and whether the assembly is in a condition that can be serviced normally.

How to identify the replacement bearings you need

Start with the axle identification and the manufacturer’s parts information. Where the service process allows it, the markings on the old cone and cup can help confirm the match.

Record inner and outer bearing information separately. Do not assume they share a number. The cup, seal and retaining components also need to match the assembly.

For a parts or service inquiry, gather:

  • Trailer make, model and identifying information.
  • Axle label details.
  • Hub type, if known.
  • Readable photographs of labels and existing part markings.
  • Any previous parts invoice.
  • A description of the problem or planned service.

Do not order solely by the trailer’s body style. A stock trailer, enclosed trailer or flatbed label does not identify the bearing set. Nor should a kit be chosen only because its product photo resembles your old parts.

If the markings are unreadable or the axle has been changed, have the identification resolved before installation. A part that seems to fit is not a substitute for a verified match.

When to bring your trailer to Carl’s

Ask for professional help if a hub is seized, you find metal or damaged surfaces, the spindle appears damaged, the grease is leaking near the brakes or you cannot confirm the correct procedure. Also choose shop service if you lack the lifting equipment, tools or experience.

Carl’s lists bearing packing among its trailer service and repair services in Belle Fourche. Describe your trailer, its hub system and any symptoms when requesting an appointment or quote.

Ask whether the trailer should be moved at all if you suspect a wheel-end failure. Do not tow it to the shop simply because that is where the repair will happen.

Brake controller settings are a separate topic. If that is what you need to understand, see our trailer brake controller guide.

Trailer wheel bearings FAQ

Does a grease fitting mean I never need to repack or inspect?

No. Identify the system and follow its inspection and lubrication schedule. A fitting makes a particular lubrication method possible. It does not certify the condition of the bearings or seals.

Do Bearing Buddy-style caps replace bearing inspections?

Do not assume an accessory changes the axle manufacturer’s inspection requirements. Identify the exact product and follow both sets of applicable instructions. A cap is not proof that the assembly uses a spindle-lubrication system.

Can you overgrease trailer bearings?

Incorrect lubrication can create seal and brake-contamination concerns. Use the system’s procedure and approved equipment. Do not keep pumping simply because you have not used up the cartridge.

How much grease goes into each hub?

There is no universal quantity for every trailer hub. Use the procedure for the assembly you have, including its specified completion point. Do not borrow a fixed pump count from another trailer.

Should I replace both bearings if one is damaged?

Have the complete wheel end inspected. Replace the damaged cone and matching cup as directed, then follow the manufacturer’s findings and requirements for other parts. Do not assume an entire axle needs replacement or that its other bearings are automatically good.

Can I repack the bearings myself?

Only undertake the job if you can identify the system and perform the full procedure safely with the correct equipment. If you are uncertain about support, parts, seals or adjustment, use a qualified service provider.

What does bearing repacking cost?

Ask for a quote for your trailer and clarify what it includes. Inspection may reveal replacement parts or related work. This guide does not give a flat price or promise a completion time.

How long can I tow with a noisy bearing?

There is no safe mileage estimate to rely on. Stop safely and have the concern assessed before continuing. Adding grease is not proof that a damaged bearing is safe.

Plan your next service or trailer purchase

If you are keeping your trailer, start with its records and the work it needs. If you are comparing used trailers, ask about maintenance history and inspection rather than judging condition by appearance alone.

Shopping for a different hauling job? Explore stock trailers, flatbed trailers or enclosed trailers, then ask Carl’s about the actual equipment and service needs of the unit you are considering.
Trailer Brake Controller Guide

November 9, 2026

A trailer brake controller lets you adjust how the trailer’s brakes work with your tow vehicle. If your trailer has electric brakes, you need a compatible controller to operate them during normal towing. A hitch and a seven-way socket alone do not tell you whether that controller is installed.

This guide walks you through the choices, the connections to check and the basics of setting gain. Whether you haul enclosed cargo out of Spearfish, tow livestock near Belle Fourche or head through the Black Hills, start with the equipment on your actual truck and trailer.

Carl’s Trailer Sales installs brake controls and electrical plugs at its Belle Fourche shop. If you would rather have the setup checked before towing, ask about brake controller installation and trailer service.

What does a trailer brake controller do?

An electric trailer brake controller manages the electrical output sent to the trailer’s brakes. When you press the truck’s brake pedal, the controller applies the trailer brakes according to its design and settings. That gives the trailer its own braking contribution rather than leaving every stop to the tow vehicle.

Most controllers give you an output adjustment, often called gain, and a manual control. Depending on the model, you may also have a connection indicator, fault messages, sensitivity adjustments or stored trailer profiles.

A controller cannot compensate for worn brakes, damaged wiring or an overloaded trailer. The truck, hitch, trailer and braking system still need to be suitable for the load. If you are sorting out those limits, Wareing Motors’ payload vs. towing capacity guide explains why the amount you can carry and the amount you can pull are different numbers.

Do you need a brake controller?

Identify the trailer’s brake system first.

  • Electric brakes: You need a compatible controller for normal braking from the tow vehicle.
  • Electric-over-hydraulic brakes: You need a controller approved for the trailer’s hydraulic actuator. Check the exact pairing and any required controller mode.
  • Conventional hydraulic surge brakes: These operate through a mechanical surge actuator at the coupler, rather than the usual electric brake-controller signal.
  • No trailer brakes: Adding a controller will not add brakes to the trailer. Check whether that trailer and load are appropriate for your vehicle and the applicable rules.

Do not use a general online weight threshold to decide whether your combination is legal. Brake requirements can depend on the jurisdiction and how the trailer is used. Check official rules for South Dakota and every state on your route, along with your vehicle and trailer manuals. The trailer’s rating label helps identify its limits, but does not replace those rules.

A seven-way plug does not prove you have a controller

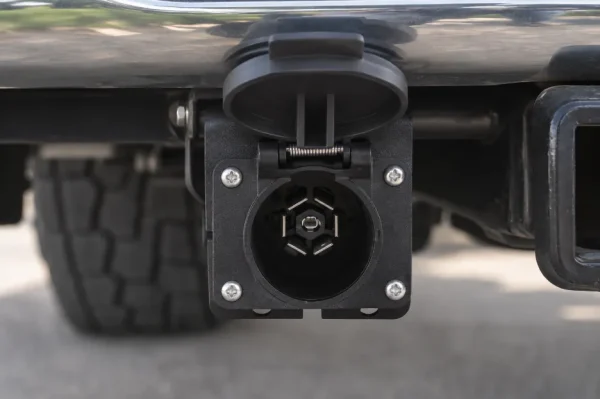
Seven-way trailer connector with flip cover mounted under a truck bumper next to the receiver hitch.
A seven-way plug carries several circuits. It does not by itself prove a brake controller is installed.

A seven-way connection can carry several circuits. Its presence does not confirm that a controller is installed, that the brake-output circuit is complete or that the equipment is compatible.

The same caution applies to a tow package. Find the controller controls and confirm the equipment in your owner’s manual or vehicle build information. A trailer menu alone is not enough to identify every installed towing feature.

Proportional vs. time-delay brake controllers

These two terms describe how the controller responds when you brake. They do not describe where it mounts.

TypeHow it respondsWhat to consider
ProportionalCommon aftermarket models sense deceleration and vary trailer braking to suit the stopCheck mounting requirements, calibration and trailer compatibility
Time-delayBuilds output over time toward a preset level when you apply the brakesYou adjust output and, where provided, how quickly it builds

A proportional brake controller responds differently to a gentle slowdown and a harder stop. That can make it a useful choice when your towing involves changing traffic conditions and frequent braking. Some factory-integrated systems use vehicle braking information rather than relying only on an aftermarket-style inertia sensor.

A time-delay controller follows its selected output and timing settings. It can provide a straightforward interface, but those settings need attention so the trailer does not feel abrupt during a light stop or slow to contribute during braking.

Neither label guarantees compatibility with your trailer. Compare the supported brake type, number of braked axles, installation requirements and accessibility of the manual control. For electric-over-hydraulic equipment, verify the actuator compatibility rather than assuming every proportional controller will work.

For a trailer you use regularly, think about the daily experience too. Can you read the display, reach the controls and understand the fault messages without searching through a menu?

Installation styles and vehicle compatibility

You can get similar braking functions in quite different packages. Choose the connection and mounting style around your vehicle, not just the appearance of the controller.

Factory-integrated controller

A factory controller uses the vehicle’s controls and displays. Before buying another unit, check whether your truck already has one and whether it supports the trailer’s brake system.

Use the owner’s manual for the exact model year and equipment. If you are buying a truck as well, the Ford Super Duty towing capacity guide and 2025 Ram towing capacity guide can help you frame the truck-side questions. Confirm the actual truck’s equipment separately.

Under-dash controller

This puts the controller and its controls together in the cab. Some vehicles accept a model-specific plug-in harness. Others need additional wiring and installation work.

Mounting position matters, particularly with controllers that sense movement. The unit must follow its manufacturer’s orientation requirements while staying clear of your legs, pedals and other controls.

Dash knob with a hidden module

This style keeps a small control within reach while the main module mounts elsewhere. It can suit a cab where you want less equipment below the dash.

The small visible knob does not eliminate the installation work. The module, wiring, mounting location and vehicle connection still need to match the manufacturer’s instructions.

Wireless or seven-way plug-in controller

Some controllers connect at the seven-way socket and use an app or separate control. They may suit drivers who move between compatible tow vehicles or want to avoid a conventional dash-mounted box.

Check power and connector requirements, supported brakes, clearance around the socket and how manual braking is accessed. Read what the specific model does if its wireless connection is interrupted. Set it up before driving, rather than trying to learn an app while towing.

What to check before ordering a kit

Have your truck’s year, make, model and towing equipment available, plus the trailer’s brake type and braked-axle count. Ask whether the kit includes the correct harness and whether vehicle configuration is needed.

Trailer brake controller wiring is vehicle- and product-specific. A wire color or generic diagram is not enough to identify a safe connection. Carl’s installs brake controls and electrical plugs, so you can ask the shop to assess the complete setup instead of guessing at a splice.

Setting gain and using the manual control

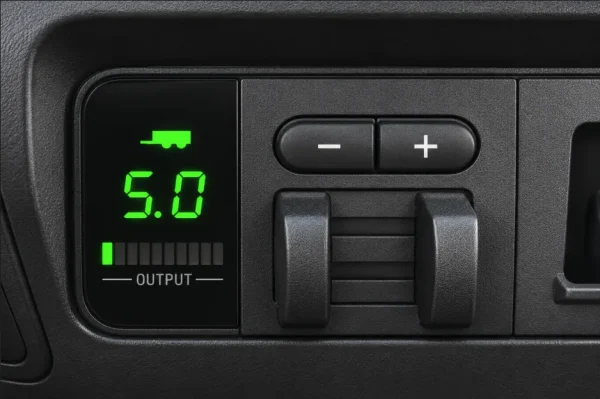
Factory-integrated trailer brake controller screen showing a gain readout with plus and minus buttons and a manual override slider.
Gain and manual override controls on a factory-style controller. The number on a display is not a universal recommended setting. Use your vehicle and controller manuals.

Gain controls the available trailer-brake output. Too little can leave the trailer contributing too little braking. Too much can produce harsh braking or wheel lockup.

There is no universal setting for a stock trailer, an enclosed trailer or a certain truck. The controller, brake system, load and conditions all matter. A number that works for your neighbor is not a setup procedure.

Start with your own manuals

Read the vehicle, controller and trailer instructions together. Use the required brake mode and complete any calibration before the driving check.

An empty, level parking area may be suitable only if it provides the space and conditions your manufacturer’s procedure requires. Some procedures specify a particular test speed and surface. Do not substitute a cramped lot, public traffic or a slippery road.

A practical setup checklist

  1. Prepare the combination. Hitch and load the trailer correctly, make the electrical connection and confirm that the brakes are in serviceable condition. Use the manufacturer’s checks for the breakaway system.
  2. Confirm the controller setup. Select the correct brake mode if your controller offers one. Check its connection indication and resolve any fault message before continuing.
  3. Use the specified starting setting. Follow your controller or vehicle manual rather than a generic gain number. Make adjustments while safely stopped where instructed.
  4. Perform the prescribed driving test. Follow the manual’s speed, surface and manual-control instructions in a traffic-free area.
  5. Adjust and repeat as directed. Aim for effective braking without wheel lockup or an abrupt tug. If the response remains weak or unpredictable, stop testing and have the system inspected.

Do not keep raising gain to work around a mechanical or electrical fault. A controller display can show an output command without proving that every wheel brake is working properly.

Recheck the settings when you change trailers or loads, and when your manual calls for adjustment as conditions change. An empty equipment trailer and the same trailer loaded for work should not automatically be treated as the same setup.

What the manual override is for

The manual control lets you command trailer braking separately from the tow vehicle’s brake pedal. Its permitted uses vary by controller and vehicle.

Follow the exact manual for setup and operation. Do not assume that advice to apply manual trailer brakes during sway is appropriate for your truck. Some OEM instructions specifically warn against that use. Likewise, do not treat the controller as a parking brake or a way to hold a parked combination on a grade.

Learn where the control is before you leave. If you are unsure how your system should respond, ask for a demonstration using your equipment.

Check the trailer side too

The controller is only one part of the system. Before choosing one, confirm how many axles have brakes and whether those brakes are electric or electric-over-hydraulic. Match the controller’s published capacity to the actual equipment, not just the trailer’s overall size.

Check trailer ratings and your intended loaded weight as part of the purchase. A controller does not increase the trailer’s GVWR or the truck’s towing rating. Horse, stock and enclosed trailers can have different brake equipment even when they look similar from the sales lot.

If you are still comparing trailers, the guides to enclosed trailer sizes and aluminum vs. steel trailers cover other buying considerations. Confirm the brakes on the specific unit you choose.

Breakaway protection is separate from normal braking

Breakaway switch box on a trailer tongue with a red coiled breakaway cable clipped to the tow vehicle and crossed safety chains underneath.
Breakaway protection is separate from normal controller braking. Follow the equipment instructions for inspection and testing.

The breakaway system is intended to apply the trailer brakes if the trailer separates from the tow vehicle. On electric-brake systems, its battery, switch and cable need attention alongside the controller.

A working breakaway system does not replace a controller for routine stops. Follow the equipment instructions for inspection and testing. Some controller manuals require disconnecting the trailer’s electrical plug before a breakaway test to prevent controller damage.

For connection, wiring and breakaway problems, use Carl’s separate trailer brakes not working guide. If the brakes still do not respond correctly, have the system checked before towing.

When to bring your setup to Carl’s

Bring the question to the shop if you have bought a different trailer, cannot confirm controller compatibility, need an installation or get inconsistent braking after following the setup procedure.

Carl’s Trailer Sales installs brake controls and electrical plugs in the shop behind its Belle Fourche sales lot. Customers come from Belle Fourche, Spearfish, Sturgis, Rapid City and nearby ranch communities.

When you call, have these details ready:

  • Tow vehicle year, make and model
  • Existing controller make and model, if known
  • Trailer type, brake system and braked-axle count
  • Any warning message and when it appears
  • Whether the issue changes with a different trailer or load

Ask about parts, scheduling and the work your combination needs. Installation cost depends on the equipment and job, so request a quote rather than relying on a generic online price.

Trailer brake controller FAQ

Will electric trailer brakes work without a controller?

For normal braking from the tow vehicle, electric trailer brakes need a compatible controller. The separate breakaway system is for a separation emergency, not everyday stops.

Do I need a controller if I have a seven-pin plug?

You may. The plug alone does not prove a controller is installed or the brake circuit is ready. Check the vehicle’s equipment and the trailer’s brake type.

Does a tow package include a brake controller?

Not necessarily. Package contents vary. Confirm the actual vehicle’s equipment using its manual, build information and controls rather than assuming the package name covers everything.

What should my trailer brake controller be set to?

Use the setup procedure for your controller and trailer. There is no single correct gain number for every load. Recheck it when the trailer or loading changes.

How do I know the controller is working?

Check its connection indication, resolve fault messages and perform the manufacturer’s driving test. A connected message or illuminated display alone does not prove proper braking at every wheel.

How does the controller detect the trailer?

Detection methods vary by model. Check your manual for what its connected message means and how it handles your brake system. If it reports no trailer or a connection fault, have the connection checked rather than assuming the display is wrong.

Is REDARC or Tekonsha better?

Compare specific models for brake compatibility, axle capacity, controls and installation style. The brand name alone cannot tell you which fits your combination. Ask about fit and support before choosing.

Where does the red wire go on a brake controller?

Use the exact controller instructions and vehicle-specific wiring information. Do not connect it based only on color or a generic diagram. Have a qualified installer verify the correct circuit.

How much does brake controller installation cost?

Call Carl’s with your vehicle and trailer details for a quote. The controller, harness, existing wiring and required installation work affect the job.

Get your truck and trailer ready to tow

Call Carl’s Trailer Sales at (605) 892-4032 or contact the Belle Fourche shop to discuss your brake controller setup.

Visit 10958 US HWY 212, Belle Fourche, SD 57717. If you are shopping for a trailer too, browse trailers for sale or used trailers in Belle Fourche, then ask about the brake equipment on the unit you are considering.

Trailer Brakes Not Working

October 15, 2026

Carl’s Trailer Sales

Trailer brakes not working

Electric trailer brakes need power from the tow vehicle, a brake controller that is on, and a plug that is fully seated. If the trailer does not slow when you expect it to, stop the trip and sort it out before the load gets bigger.

This is a shop-level check, not a wiring lesson. Carl’s can test magnets, wiring, and the breakaway battery on a trailer in Belle Fourche. If the brakes are required for the weight you are hauling, do not keep driving on the hope that the truck brakes will cover it.

A white Ford Super Duty towing a horse trailer at sunset, with a breakaway switch and round trailer connectors in the foreground
A Super Duty with a trailer, a breakaway switch, and trailer connectors. Pictures for illustration purposes only. This photo is not a wiring diagram.
Trailer service
Call (605) 892-4032

Start here

The first four checks

Controller on

The box in the truck has to be powered, and the gain has to be high enough to feel.

Plug seated

A 7-way that is half in will light the trailer and still leave the brakes dead.

Breakaway pin

If the pin is pulled, the trailer brakes can be locked on, or the battery can be drained.

Then the shop

Magnets, wiring, and the breakaway battery need a meter, not a guess from the driveway.

How electric trailer brakes get power

Most stock and horse trailers with electric brakes use an electromagnet inside each brake. The tow vehicle sends power through the trailer plug. A brake controller in the cab decides how much. Manual levers on the controller let you apply the trailer brakes without stepping on the truck pedal. That is the feel test people use in an empty lot.

If the brake controller shows no connection, or the manual lever does nothing, the fault is often the connector, the controller power, or a broken wire between the connector and the axle. Carl’s can find which one. We will not print a pin-by-pin wiring recipe here. A wrong wire can lock a brake or leave you with none. The shop test covers the brake magnets, the brake shoes, and the brake drum. Hydraulic brakes are a different system and do not use this controller.

What you can check before the shop

Turn the controller on and set the gain where you can feel the trailer tug when you use the manual lever, in a safe open area, at low speed. If you feel nothing, unplug the 7-way, look for bent pins or corrosion, and push it back in until it seats. A connector that runs the lights can still miss the brake circuit.

Look at the breakaway switch on the trailer tongue. The pin should be in the switch, and the cable should be clipped to the tow vehicle so it pulls only if the trailer separates. A pin left out on purpose, or knocked out in a yard, can apply the brakes the whole time you drive. It can flatten the breakaway battery, and the switch does nothing on the day you actually need it.

After those checks, stop. Magnets wear. Wiring rubs through at the axle. A weak breakaway battery will not show up in a glance. That is the trailer service visit.

Brakes and the weight you are hauling

A light empty trailer can feel fine with weak brakes. The same trailer loaded with cattle, horses, or a stack of panels will push the truck. Match the brake system to the GVWR on the trailer placard, not to how it felt on the last empty haul.

If you are still choosing a trailer, look at trailers for sale, including stock trailers and horse trailers. Ask which axles have electric brakes before you leave the lot.

Bring the trailer to Belle Fourche

Carl’s Trailer Sales is at 10958 US HWY 212, Belle Fourche, SD 57717. Tell us whether the controller shows a connection and whether the breakaway pin was in. We will test from there.

Schedule trailer service

Common questions

Why are my trailer brakes not working?

Start with the controller power and gain, a fully seated 7-way plug, and the breakaway pin in the switch. If those are right and you still feel nothing, the magnets, wiring, or breakaway battery need a shop test.

The lights work. Why don’t the brakes?

Running lights and electric brakes use different circuits in the connector. A connector can pass light power and still miss the brake pin. Seat it again, then have the brake circuit tested if the brake controller still shows no connection.

What does the breakaway switch do?

It applies the trailer brakes if the trailer separates from the tow vehicle. The pin should stay in the switch during normal towing. A pin left out can lock the brakes or drain the breakaway battery.

Can Carl’s test trailer brakes?

Yes. Bring the trailer to Carl’s Trailer Sales in Belle Fourche. Call (605) 892-4032 or use the trailer service page to set a time.

Aluminum vs Steel Trailers

October 8, 2026

Aluminum Wilson stock trailer parked next to a steel Circle D stock trailer on the lot at Wareing Carl's Trailer Sales in Belle Fourche

Aluminum vs Steel Trailers in Belle Fourche

The metal under your trailer changes what it weighs, how you care for it, who can fix it, and what you pay. Wareing Carl’s Trailer Sales has both on the lot, so you can compare them side by side.

View Trailer Inventory
Call (605) 892-4032
Toll-Free (800) 861-4032

Pictures for illustration purposes only.

Aluminum or steel is a tradeoff, not a winner

The aluminum vs steel trailer question comes down to four things: weight, rust, repairs, and price. Steel trailers usually cost less up front and are easier to get welded. Aluminum trailers weigh less empty and do not rust the way bare steel does. Both can be built strong. Both need care. The right one depends on what you haul, how often you pull it, where you park it, and how long you plan to keep it.

This is a real choice on our lot. We carry aluminum gooseneck stock trailers from Wilson and Hillsboro, steel stock and flatbed trailers from Circle D, steel flatbed, dump, and utility trailers from H&W, and steel Iron Bull dump trailers. Even our truck flatbeds come in both, with aluminum and steel beds from Hillsboro.

We will not tell you one metal is always better. We will show you the actual trailers, the plates, and the prices so you can decide.

Aluminum vs steel trailers at a glance

Decision point Aluminum trailer Steel trailer
Empty weight Lighter, which can leave more of the GVWR for cargo Heavier for the same size and job
Rust and corrosion Does not rust, but salt, urine, and manure can still corrode it Rusts where paint or coating is chipped
Upkeep Wash often, clean under mats, rinse after road salt Wash, watch for chips, touch up paint
Repairs Needs a shop set up for aluminum welding Most welding shops can work on it
Price direction Usually higher up front Usually lower up front
Common on our lot Wilson and Hillsboro stock, all-aluminum enclosed Flatbeds, dumps, utility, Circle D stock

These are general tradeoffs. Design, frame size, floor, axles, and how the trailer is used matter as much as the metal.

Aluminum vs steel trailer weight

Every pound the trailer weighs empty is a pound of its rating you cannot use for cattle, hay, or equipment. That is the main reason people pay more for aluminum. Aluminum construction is the lightweight side of an aluminum vs steel trailer. On a long trip, that lower empty weight can leave more of the tow vehicle’s payload capacity for the load. Read the GVWR and the empty weight before you treat that as a number. A lighter trailer can be easier on your truck over a long pull to the sale barn.

Do not assume the savings, though. Compare the two actual trailers you are looking at. Read the GVWR on each certification label and get the real empty weight. Then do the math in our trailer GVWR vs payload guide. A heavier steel trailer with a higher GVWR can still carry more than a lighter aluminum one with a lower rating.

Your truck still has to be rated for the loaded trailer. The hitch still has to match the trailer. If the hitch type is an open question, read bumper pull vs gooseneck trailers next.

Rust and corrosion: neither metal gets a pass

Steel rusts once water reaches bare metal. It does not have aluminum’s corrosion resistance. Gravel chips, scraped gates, and worn floors are where it starts. Catch it early. Sand the spot, let it dry, and touch it up with rust-proof paint.

Aluminum does not rust, but it is not maintenance free. Featherlite, which builds aluminum trailers, warns that horse urine and manure can corrode aluminum floors. It also tells owners to wash the whole trailer right after exposure to road salt and deicer. If you haul livestock, pull the mats and clean under them. If you pull through winter, rinse the trailer when you get home.

Either way, a trailer parked dirty and wet wears out faster. Washing is the cheapest repair you will ever make.

Strength and repairs

A well-built aluminum trailer and a well-built steel trailer can both carry their rated load. Strength comes from the design, not just the metal. Read the GVWR and axle ratings instead of judging by the material.

Repairs are a real difference. Steel is the metal most welding shops work with every day. Aluminum takes different equipment and experience, so fewer shops do it well. Ask where the trailer will be fixed before you buy it.

That question has an easy answer here. Wareing Carl’s Trailer Sales is an authorized Wilson Gooseneck and Semi Trailer repair center, and our trailer service and repair shop works on the trailers we sell.

Price: what the difference looked like on our lot

Aluminum usually costs more. Here is a real example. When we checked our listings in October 2026, new 7′ x 24′ aluminum Wilson gooseneck stock trailers were listed from $30,750 to $34,350. A new 7’6″ x 24′ aluminum Hillsboro was listed at $32,250. A new 6’8″ x 24′ Circle D gooseneck stock trailer, from a steel trailer builder, was listed at $19,100.

Those trailers differ in width, compartments, and features, so treat that as a direction, not a quote. Prices and inventory change. Check the current trailer inventory for today’s numbers, and weigh the higher price against how long you plan to keep the trailer.

Which metal fits which trailer?

Stock and horse trailers

This is where the choice comes up most. Aluminum suits owners who haul often and far, and who will keep up with washing. Steel suits owners who want the lower price and haul shorter distances. Compare both on our stock trailers and horse trailers pages.

Flatbed, dump, and utility trailers

Most of the flatbed, dump, and utility trailers on our lot are steel, from builders like H&W, Circle D, and Iron Bull. If you are weighing an aluminum vs steel utility trailer for ranch work, steel is what most of our utility trailers are made of. Gravel, skid steers, and equipment are hard on a deck, and steel is simple to repair after a rough season. See the flatbed trailers and dump trailers pages.

Enclosed trailers

Our new E-Z Hauler enclosed trailers are listed as all-aluminum builds. If you pull an enclosed trailer behind a half-ton or an SUV, lower empty weight helps. See enclosed trailers.

Used trailers

On a used steel trailer, look for rust at welds, crossmembers, and the floor. On a used aluminum trailer, look for cracks near welds, corrosion under mats, and loose rivets. Browse used trailers and ask us to walk it with you.

Questions to answer before you pick

  • What do you haul, and how heavy is a full load?
  • How many miles a year will the trailer travel?
  • Will it see road salt, or sit outside year round?
  • Will you wash it after every livestock haul?
  • What is your truck’s tow rating and payload?
  • Where will you get it repaired if a gate or crossmember gets bent?
  • How long do you plan to keep it?

The metal is not the whole trailer. Aluminum construction is the lightweight path, and that can change payload capacity once you read the GVWR. Corrosion resistance is real on aluminum, and corrosion still shows up if urine or road salt sits. Tires wear on their own. Our trailer tire guide covers how long trailer tires last. The hitch still has to match, bumper-pull or gooseneck. On the highway, a lighter trailer can mean less strain on the tow vehicle. Durability still comes from the build, the wash maintenance, and where you get it repaired. The right trailer is the one whose material, price, and repair plan match the work. The safety check is the truck’s tow rating and the trailer’s GVWR.

Aluminum vs steel trailer FAQ

Are aluminum trailers better than steel trailers?

Not always. Aluminum weighs less empty and does not rust, but it usually costs more and needs a shop that can weld aluminum. Steel usually costs less and is easier to repair, but it needs paint touch-ups to keep rust away. What you haul and how you use the trailer decide the better choice.

Do aluminum trailers rust?

Aluminum does not rust like steel, but it can corrode. Featherlite warns that urine and manure can corrode aluminum floors and recommends washing the trailer right after it is exposed to road salt or deicer.

What are the downsides of an aluminum trailer?

The main ones are price and repairs. Aluminum trailers usually cost more up front, and fewer shops can weld aluminum well. Aluminum can corrode if urine, manure, or road salt sits on it, so it needs regular washing.

Do aluminum trailers last longer than steel trailers?

They can, because aluminum will not rust out the way neglected steel does. Care matters more than the metal, though. A steel trailer that is washed and touched up can last a long time, and an aluminum trailer that sits dirty can still corrode.

Is an aluminum trailer worth the extra cost?

It can be if you haul often, pull long distances, or plan to keep the trailer a long time. If you haul a few times a year close to home, a steel trailer may make more sense. In October 2026, new aluminum 24-foot gooseneck stock trailers on our lot were listed well above a new 24-foot Circle D, so compare the actual trailers.

Can I haul more with an aluminum trailer?

Only if the numbers say so. Payload is the trailer’s GVWR minus its actual empty weight. A lighter trailer leaves more room for cargo only when the GVWR is the same or higher. Check the label on each trailer and weigh it empty.

Which is easier to repair, steel or aluminum?

Steel. Most welding shops work with steel. Aluminum repairs need different equipment and experience. Wareing Carl’s Trailer Sales is an authorized Wilson Gooseneck and Semi Trailer repair center in Belle Fourche.

Does Wareing Carl’s Trailer Sales sell both steel and aluminum trailers?

Yes. We carry aluminum stock trailers from Wilson and Hillsboro, steel trailers from Circle D, H&W, and Iron Bull, all-aluminum E-Z Hauler enclosed trailers, and aluminum or steel truck flatbeds.

Compare aluminum and steel on one lot

Wareing Carl’s Trailer Sales, 10958 US HWY 212, Belle Fourche, SD 57717. Customers come from Spearfish, Sturgis, Rapid City, and nearby ranches.

View Trailer Inventory
Contact Us

How Long Do Trailer Tires Last

September 22, 2026

Carl’s Trailer Sales

Trailer tires often age out before they wear out. A stock trailer can sit for months, then take a loaded trip to the sale barn. The tread can still look deep when the sidewall has been baking in the sun. That is why “how many miles” is the wrong first question.

Trailers for sale
Call (605) 892-4032

Storage changes the life of trailer tires, and miles are only part of the story. Trailer tires stored in the sun can crack in the sidewall. People call those cracks dry rot. A tire that sits can flat-spot. Check tire pressure when the rubber is cold, and match the load range printed on the sidewall to the placard on the trailer. The spare on a stored trailer ages on the same clock.

There is no federal rule that says every trailer tire must come off at one birthday. NHTSA tells you to stop using a tire that is worn, cut, cracked, bulged, or damaged by low pressure or too much weight. NHTSA says some vehicle and tire manufacturers recommend replacing tires that are 6 to 10 years old, even when the tread remains. Your tire maker and the placard on the trailer are the instructions that apply to your setup.

Start here

The short version

Date code

The last four digits of the DOT number are the week and year the tire was built.

No single age

NHTSA, Goodyear, and Bridgestone do not share one replacement birthday.

Tread and cracks

Worn tread, cuts, bulges, and dry rot can finish a tire before the miles do.

The spare

A spare ages in storage too. Check it with the rest.

Jump to what matters

Read the date code first
What the tire makers actually say
Walk every trailer tire
Tread, cracks, and load still come first
A simple way to decide
Visit
When to replace the tires
Common questions

Read the date code first

The age starts with the DOT Tire Identification Number on the sidewall. It begins with the letters DOT. The last four digits are the week and the year the tire was built. NHTSA’s example is 0308, which means the third week of 2008. A code ending in 0921 means the ninth week of 2021. Goodyear uses the same reading in its RV tire bulletin.

Diagram showing how to read a trailer tire DOT date code, with 3224 marked as week 32 of 2024
A diagram of the date code. This example ends in 3224, week 32 of 2024. The last four digits are the week and the year. Pictures for illustration purposes only.

Look at both sidewalls. NHTSA says the full number may be on only one side. Write the four digits down before you decide the tire is “about five years old.” A tire can sit in a warehouse before it is mounted, so the build date is not the same thing as the day it was first put in service.

What the tire makers actually say

NHTSA

Replace for wear, damage, or underinflation and overload damage. Some manufacturers recommend replacement at 6 to 10 years regardless of tread.

Goodyear, RV tires

Recommends replacing RV tires that have been in service 6 years or more, when they still look fine. If you do not know the in-service date, use the DOT build date.

Bridgestone

Inspect after five years. Remove tires manufactured 10 years prior, including the spare. Many tires need to come off sooner for wear or damage.

Goodyear’s RV bulletin, published through NHTSA, is careful about this. It says calendar age alone cannot predict when an RV tire should be replaced, and that no single scientific timetable covers every tire. The 6-year in-service recommendation is Goodyear’s guidance for RV tires, including the spare. It is not a law that covers every utility trailer in the county. If your tires are a different brand, follow that brand.

Walk every trailer tire

Do not stop at the tire closest to the shop door. Trailer tires on the sunny side and trailer tires on the shady side can tell two different stories. Check each tire, then the spare.

On every tire, read the date code, look at the tread, and feel the sidewall. Trailer tires with deep tread can still show dry rot. Trailer tires with even wear can still be old. Write down what you see so a clean tire does not talk you out of looking at the next one.

Wheels matter with the tires. A bent wheel, a loose lug, or a tire that sits crooked on the axle is a reason to stop. Low tire pressure on one tire overloads the other tires on that axle. That is how a short trip turns into a blowout.

Replace trailer tires that fail the tread, the sidewall, or the age guidance from their maker. Replace them as a set when the tires are the same age and one of them is done. Mixing one new tire with three older tires on the same trailer makes the new tire do more than its share.

Stored trailer tires need the same walk. Tires stored outside crack sooner. Tires stored under a cover still age. Flat spotting shows up as a thump for the first miles after a trailer has been sitting. Tire covers slow the sun. They do not reset the date code.

Passenger vehicle tires are the wrong fix for a trailer axle. Trailer tires are built for a heavy load that sits, then rolls. Car tires are built for a car. If you are unsure which tires are on the trailer, read the sidewall and the placard before you buy the next set.

Tread, cracks, and load still come first

A young tire can be done. NHTSA’s reasons to stop using a tire include tread worn down to the penny test, cuts, cracks, bulges, and irregular wear from low pressure or overloading. Trailer tires see long sits and then a heavy load. Low pressure on a loaded trailer is a common way to ruin a tire that still shows a fresh date code.

Close-up of a tire sidewall with a long crack and fine checking in the rubber
A crack running through the sidewall, with fine checking around it. A crack like this is a reason to take the tire off.

Use the tire placard on the trailer for size and tire pressure, not the number printed as a maximum on the sidewall. Check tire pressure cold, before the highway miles. The spare tire ages even when it never rolls. NHTSA says spare tires are easy to forget for that reason. Uneven wear on the tires usually means tire pressure, load, or an axle issue, not a mystery.

Trailer tire sidewall stamped Load Range E
This sidewall is stamped Load Range E. Match that letter to the placard on the trailer.

Here is the short version of the tire life check. Read the age on the tires. Look for wear on the tires. Look for cracks on the tires. Compare the tires with the placard. Then decide if you replace the tires or send the trailer out. Good tread on old tires is not a free pass. Fresh tires with a cut still come off. The life of the tires is the shorter of age, wear, and damage.

Weight matters as much as age. If you are matching a trailer to a truck, the GVWR vs payload guide explains why the scale reading and the hitch share the load. Hitch style changes the truck setup, which is covered in the bumper pull vs gooseneck guide.

A simple way to decide

Read the DOT date on every tire, including the spare. Look for cracks, bulges, and uneven wear. Confirm the pressure and the load against the trailer placard. If the tires are in the 6 to 10 year window your manufacturer talks about, or if you cannot tell when they were mounted, have them inspected before the next loaded trip.

Come see it in person

Carl’s Trailer Sales can look at the tires with the rest of the trailer at 10958 US HWY 212, Belle Fourche, SD 57717. Service is listed at trailer service and repair. If you are shopping a different trailer, start with trailers for sale in Belle Fourche. Call (605) 892-4032.

Trailers for sale
Trailer service

When to replace the tires

Replace trailer tires for tread wear, for dry rot, or for a date code that has reached the window your tire maker publishes. One flat tire is a reason to inspect the other tires, not a reason to ignore them. A cut in the tire tread or the tire sidewalls means that tire is done.

Miles are a clue. Life is the combination of miles, storage, and load. Rubber that looks chalky has been in the sun. Tire covers help stored tires. They do not stop age. Load range on the sidewall has to match the placard. The wrong tires on a trailer axle are a towing problem and a safety problem.

How long do trailer tires last if you do the walk every season? Longer than tires you never look at. Tires last when pressure is right, the load is right, and you replace them before the sidewall gives up. A blowout on the highway is the expensive way to learn the date code.

Frequently asked questions

How do I tell how old a trailer tire is?

Find the DOT number on the sidewall. The last four digits are the week and year it was built. A code ending in 0921 was built in the ninth week of 2021. Check both sides. The full number may be on only one sidewall.

Do I have to replace trailer tires at six years?

Not by federal law. NHTSA says some manufacturers recommend replacement between 6 and 10 years. Goodyear’s RV guidance says to replace RV tires that have been in service 6 years or more. Bridgestone says to remove tires at 10 years and inspect them after five. Follow the maker of the tire on your trailer.

Can trailer tires with good tread still be unsafe?

Yes. Age, cracks, bulges, and damage from low pressure or too much weight can finish a tire before the tread is gone. NHTSA lists those as reasons to stop using a tire.

Does the spare tire count?

Yes. Spares age even when they are not used. NHTSA and Bridgestone both tell you to include the spare when you check age.

Can Carl’s check my trailer tires?

Yes. Bring the trailer to Carl’s Trailer Sales in Belle Fourche for service, or ask when you are looking at inventory. We can help you match the date codes to the load the trailer is rated to carry.

Be the first to know

Receive an email each day that there are new trailer listings.

Subscribe now

Physical Address

Wareing Carl's Trailer Sales
10958 US HWY 212
Belle Fourche, SD 57717

Map and Directions

Hours

Monday - Friday:
8:00 am - 5:00 pm
Saturday: 8:00 am - 12:00 pm

Phone

(605) 892-4032
(800) 861-4032

Mailing Address

Wareing Carl's Trailer Sales
PO Box 98
Belle Fourche, SD 57717

Contact Us

Carl's Trailer Sales logo

© 2026 Wareing Carl's Trailer Sales, A Wareing Motors Company · Log in · Website by Black Hills Web Works